Documentation
Learn how to integrate Akyn knowledge bases into your AI applications using MCP.
Introduction
Akyn exposes your knowledge bases through two methods: the Model Context Protocol (MCP) for AI assistants, and a REST API for direct integration. Both allow semantic search across your custom data sources.
Connection Methods:
- MCP Server: For AI clients like Claude, Cursor, n8n. Uses SSE transport.
- REST API: For direct integration via HTTP POST requests.
Quick Start
Available Tools
query
Semantically search the knowledge base for relevant context. Use scope to search indexed sources only, stored memories only, or both.
// Arguments
{
  "question": string,       // required
  "scope"?: "all" | "sources" | "memory"  // default: "all"
}
list_sources
List all indexed sources (files and URLs) in the knowledge base.
// Arguments
{ }write_memory
Persist a concise fact, decision, or preference so it can be retrieved in later sessions via query with scope: "memory" or "all". Exposed only when memory is enabled on the knowledge base (private bases).
// Arguments
{
  "content": string,        // required — standalone statement
  "tags"?: string[]         // optional labels for retrieval
}
Memory
Owners can turn on memory for a knowledge base so connected agents can store durable notes from conversations and search them later. Memories are private to that base; owners can review and delete them from the dashboard at any time.
- Use
querywithscope: "sources"to search only uploaded documents and URLs. - Use
scope: "memory"to search only agent-written memories. - Use
scope: "all"(default) to combine both when memory is enabled.
Connection Methods
Use SSE transport to connect AI assistants to your knowledge base. The MCP server exposes tools for search, listing sources, and (when memory is enabled) writing memories.
- URL:
https://akyn.dev/mcp/[kb_id] - Transport:SSE (Server-Sent Events)
- Auth:
Authorization: Bearer [api_key]
Available MCP Tools:
query— Semantic search (question, optionalscope)list_sources— List indexed documentswrite_memory— Store a memory (when memory is enabled on the KB)
Use the REST API for direct HTTP integration without MCP. Send a query and receive matching context.
- Endpoint:
POST https://akyn.dev/api/query - Auth:
Authorization: Bearer [api_key]
Request body:
{
  "knowledgeBaseId": "[kb_id]",
  "query": "Your question here"
}
Response:
{
  "results": [
    { "text": "...", "score": 0.95, "metadata": {...} }
  ],
  "tokenCount": 128,
  "responseTimeMs": 245
}
Connect to n8n
Use n8n's AI Agent node with Akyn's MCP server to give your workflows access to knowledge bases.
Create an AI Agent workflow
Start by adding an AI Agent node to your n8n workflow. Connect it to a Chat Model of your choice (e.g., OpenAI, Anthropic) and add an MCP Client as a Tool.

A basic workflow: Trigger → AI Agent with a Chat Model and MCP Client tool.
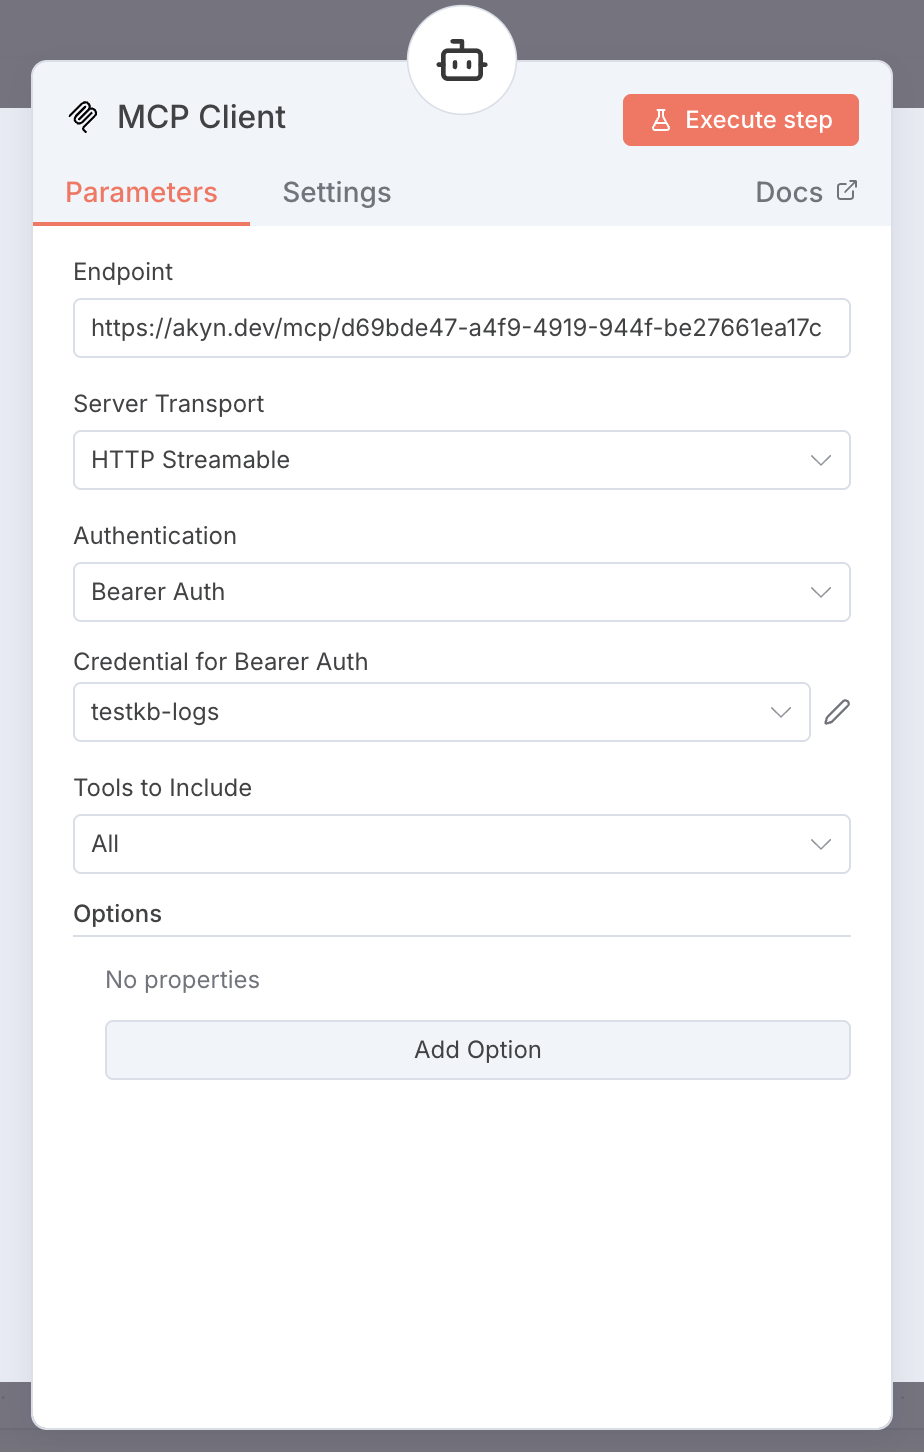
Configure the MCP Client node
Click on the MCP Client node and configure it with the following settings:
- Endpoint:
https://akyn.dev/mcp/[your-kb-id] - Server Transport:HTTP Streamable
- Authentication:Bearer Auth
- Tools to Include:All
Add your Akyn API Key
Click the pencil icon next to "Credential for Bearer Auth" to create a new credential. Enter your Akyn API Key as the Bearer Token.
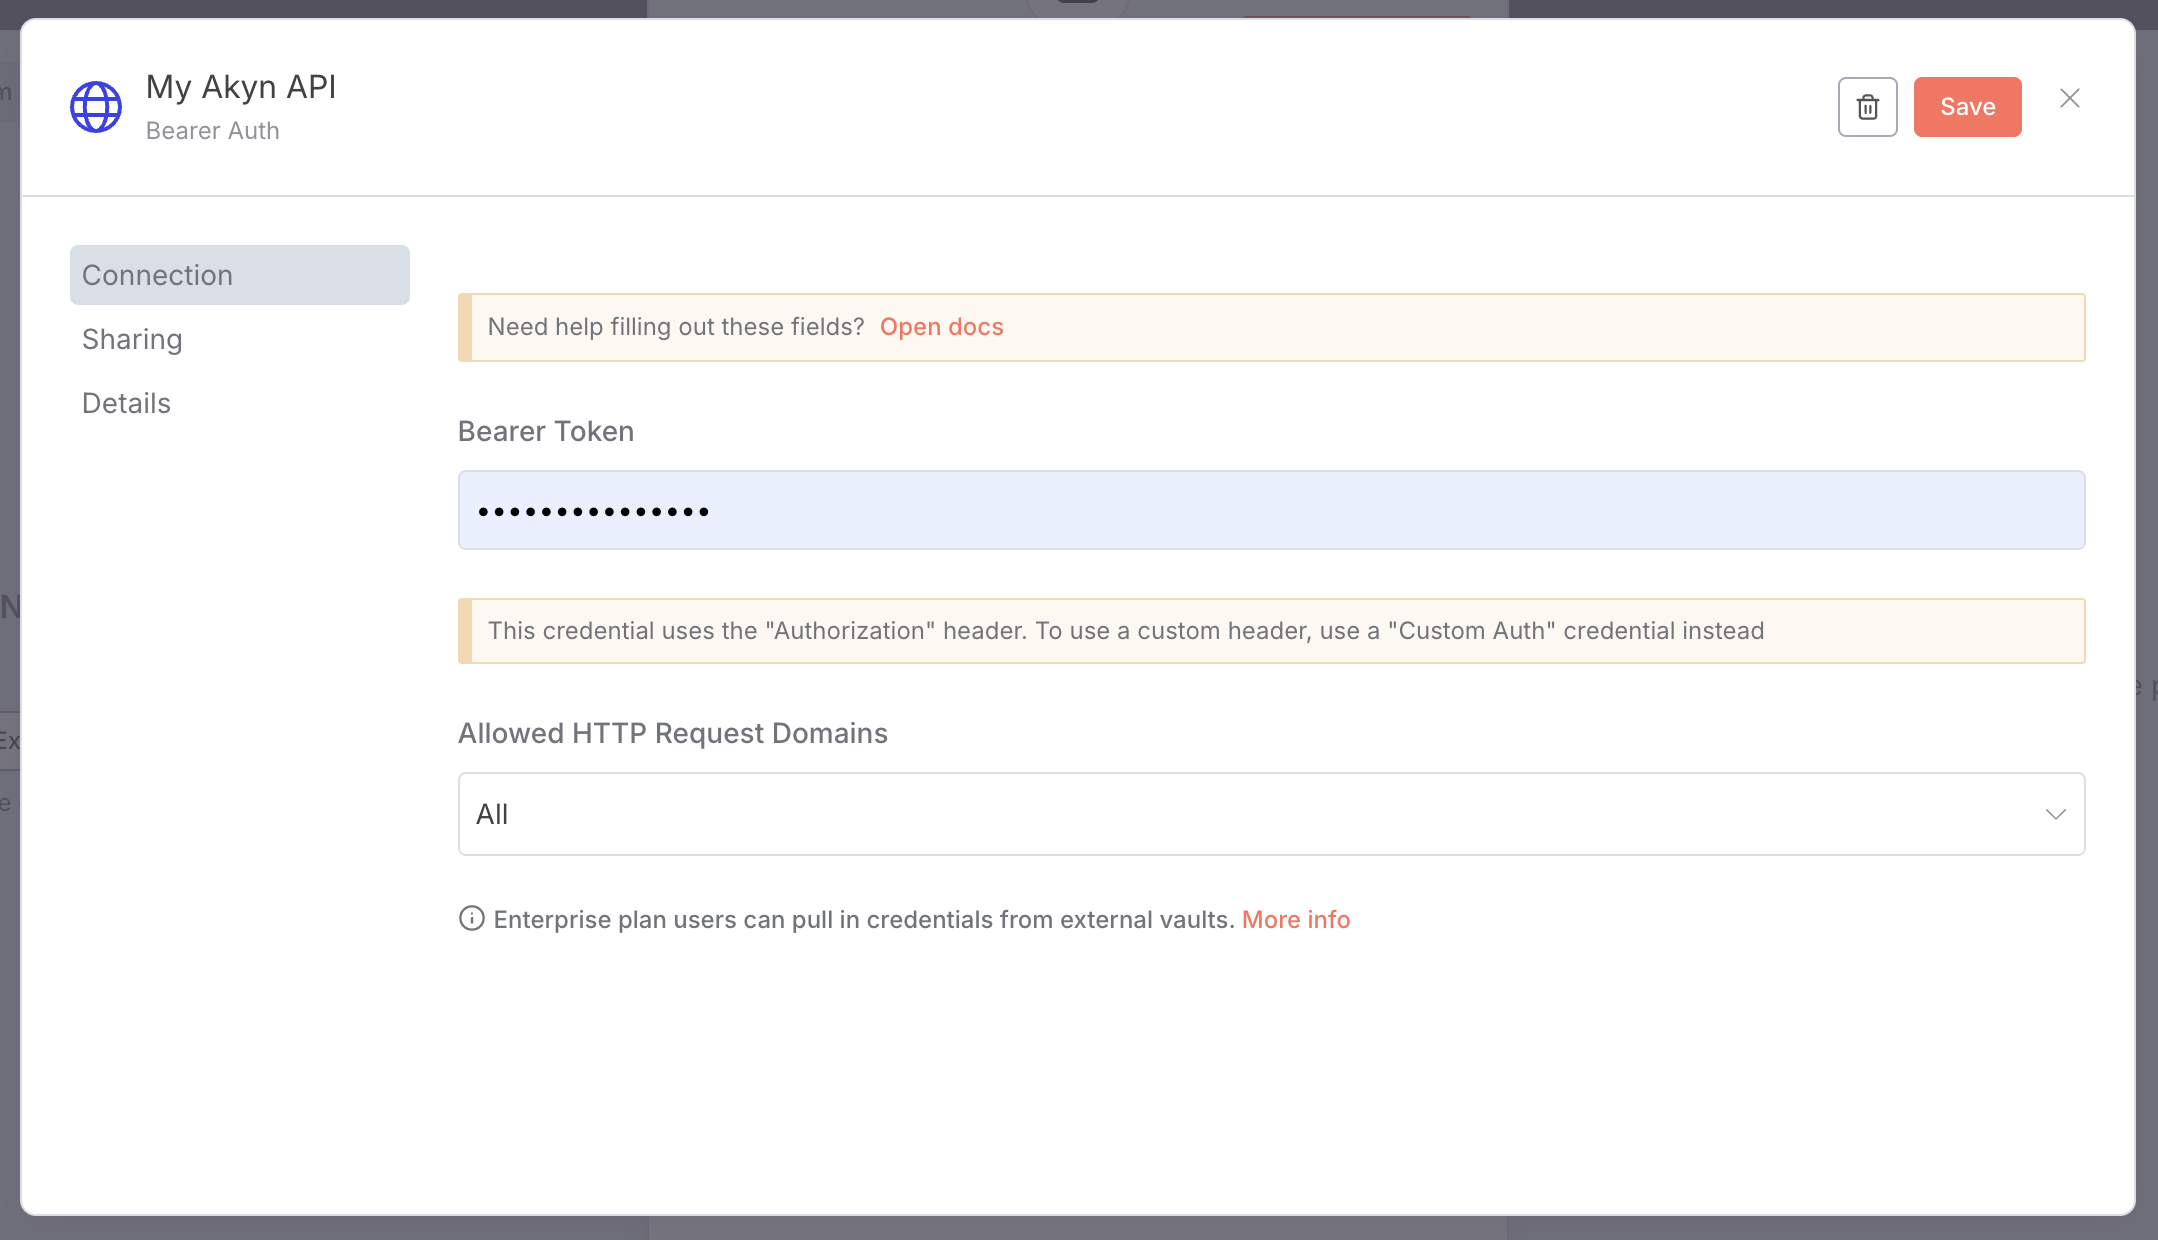
You can generate an API key from your Dashboard Settings.
Test the connection
Click the "Execute step" button on the MCP Client node. If the connection is successful, you'll see Akyn's MCP tools (query, list_sources, and write_memory when memory is enabled on that knowledge base).
Connect multiple Knowledge Bases
Need to query multiple knowledge bases? Simply add additional MCP Client nodes, each configured with a different knowledge base endpoint. The AI Agent will have access to all of them as separate tools.
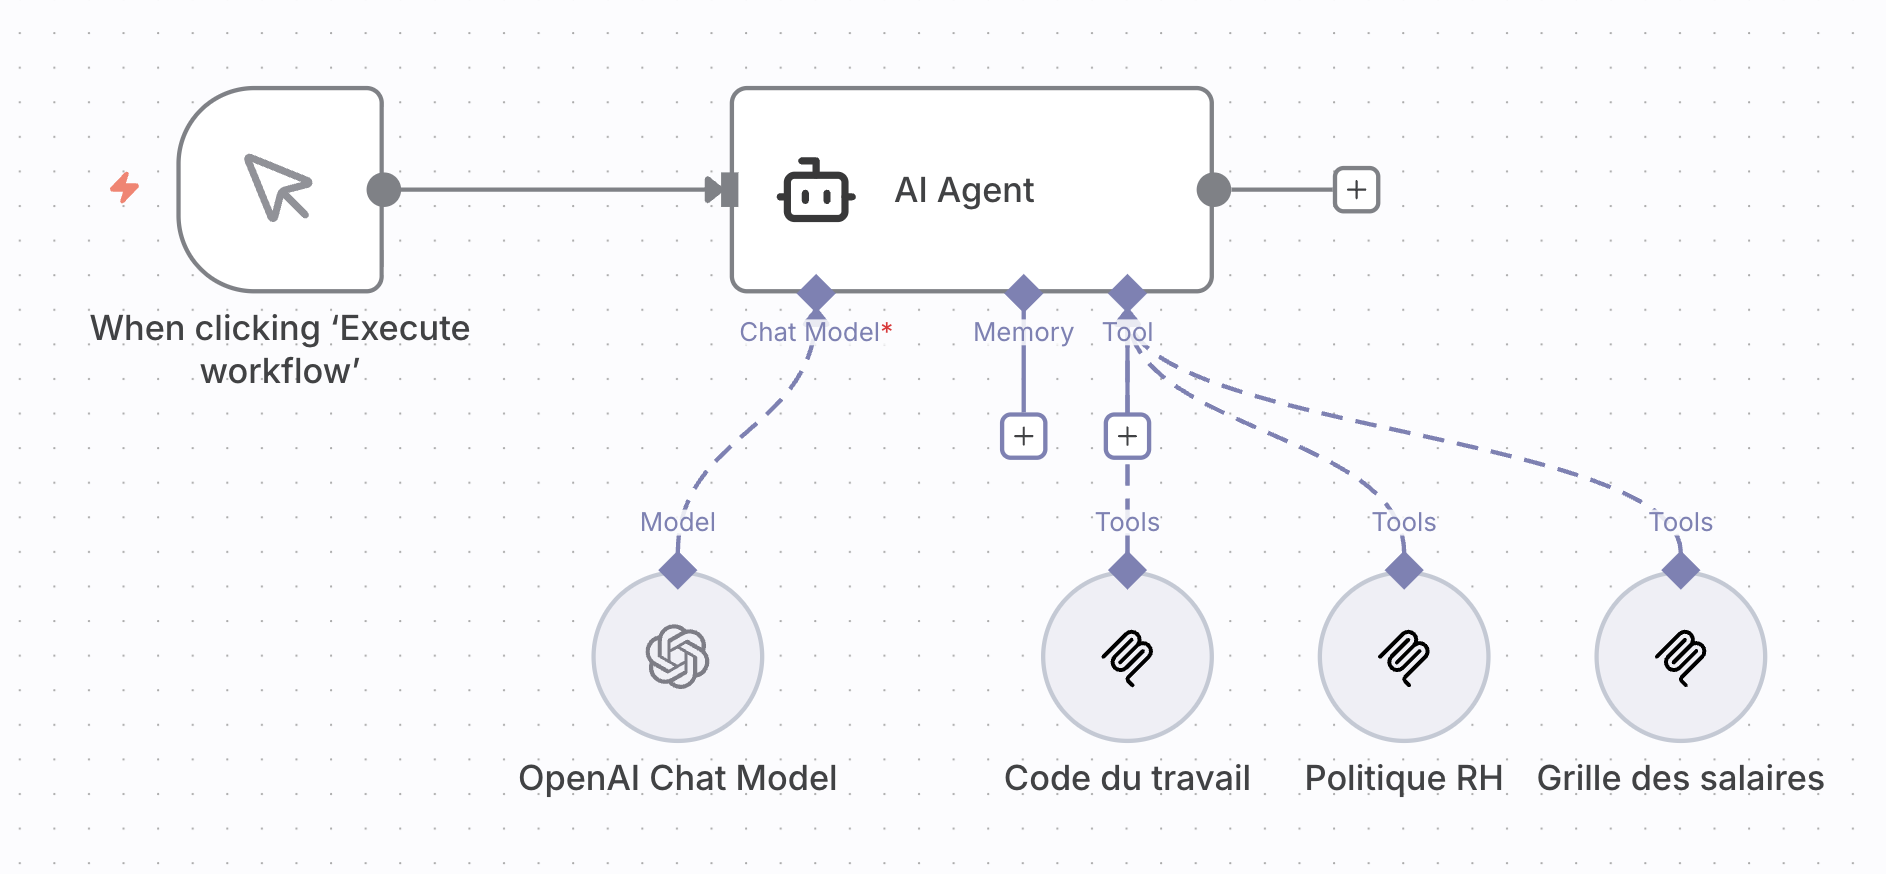
Example: An AI Agent with access to three different knowledge bases.

Connect to Dust
Add Akyn knowledge bases as MCP tools in Dust to give your agents access to custom context.
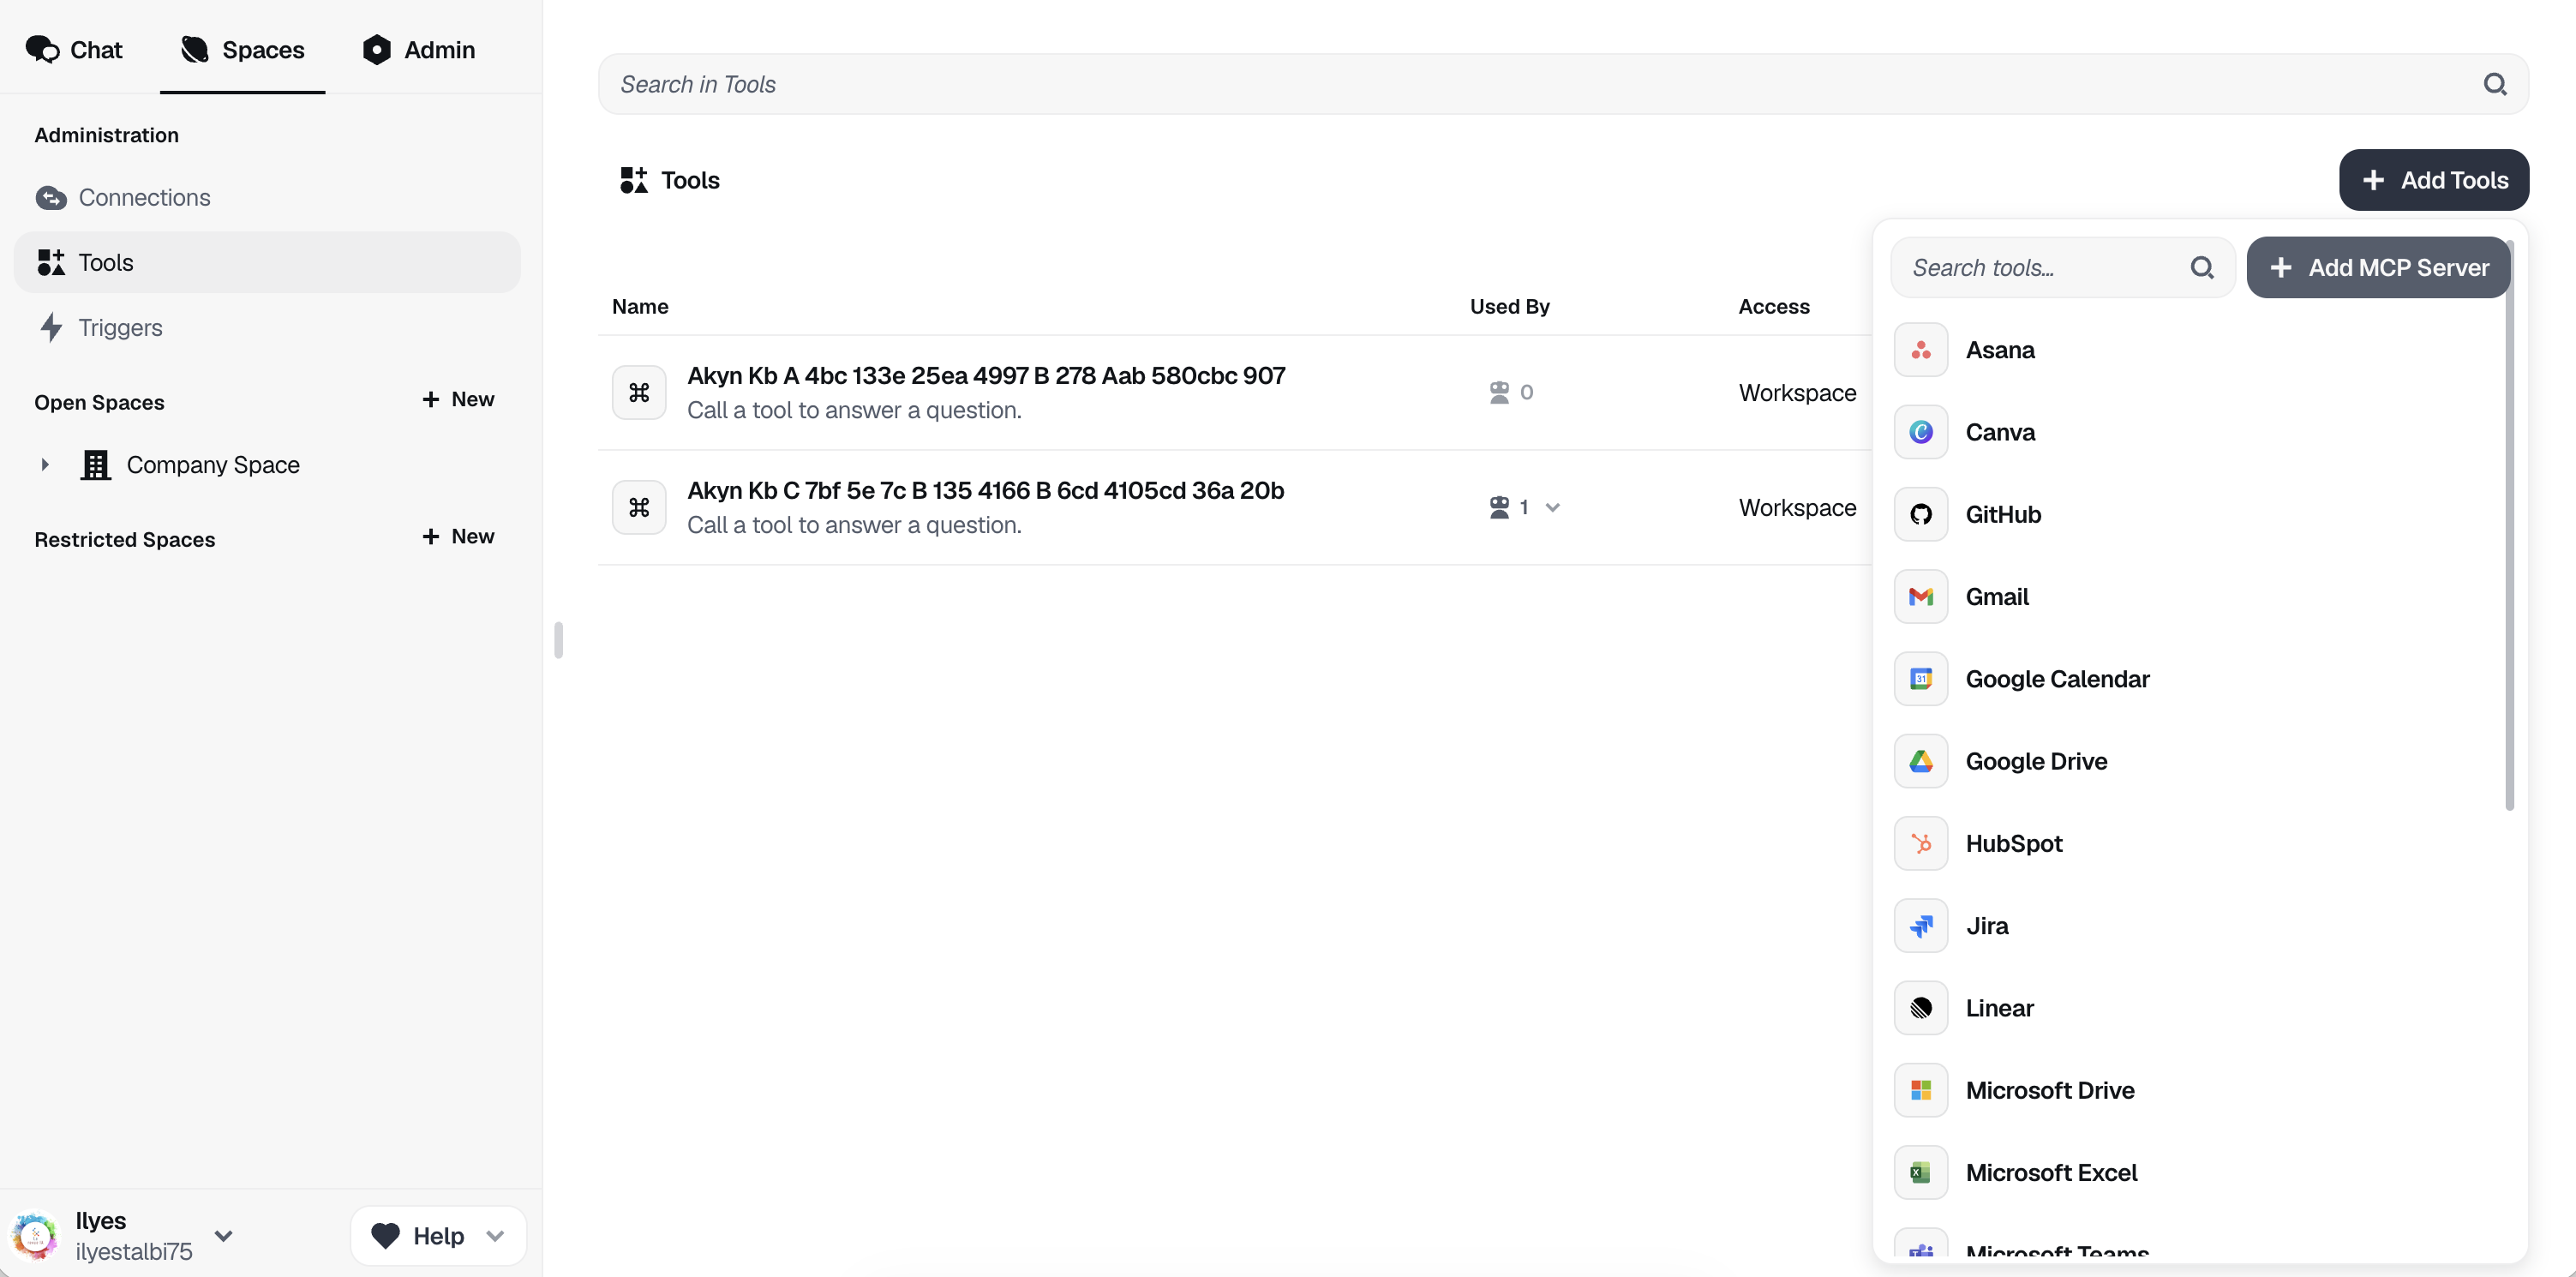
Go to Spaces → Tools
In Dust, navigate to the Spaces tab, then click on Tools in the sidebar. Click the "Add Tools" button and select "Add MCP Server".
Add the MCP endpoint and API key
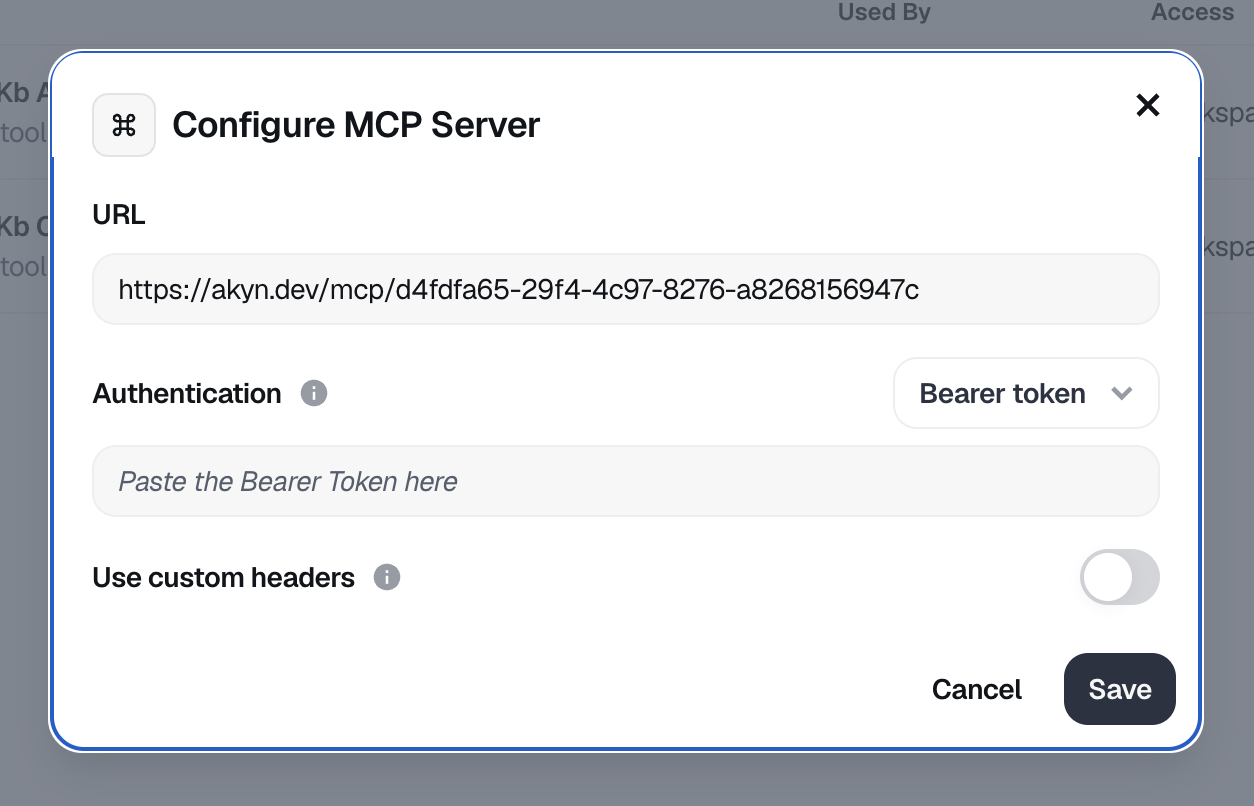
In the "Configure MCP Server" dialog, enter your Akyn MCP endpoint URL and your API key as the Bearer token:
- URL:
https://akyn.dev/mcp/[your-kb-id] - Authentication:Bearer token
- Bearer Token:Your Akyn API key
Name your tool and verify connection
After saving, a configuration panel appears on the right. Give your tool a Name and Description — this helps your Dust agent decide when to use the knowledge base. Check the "Available Tools" section to confirm the connection works.
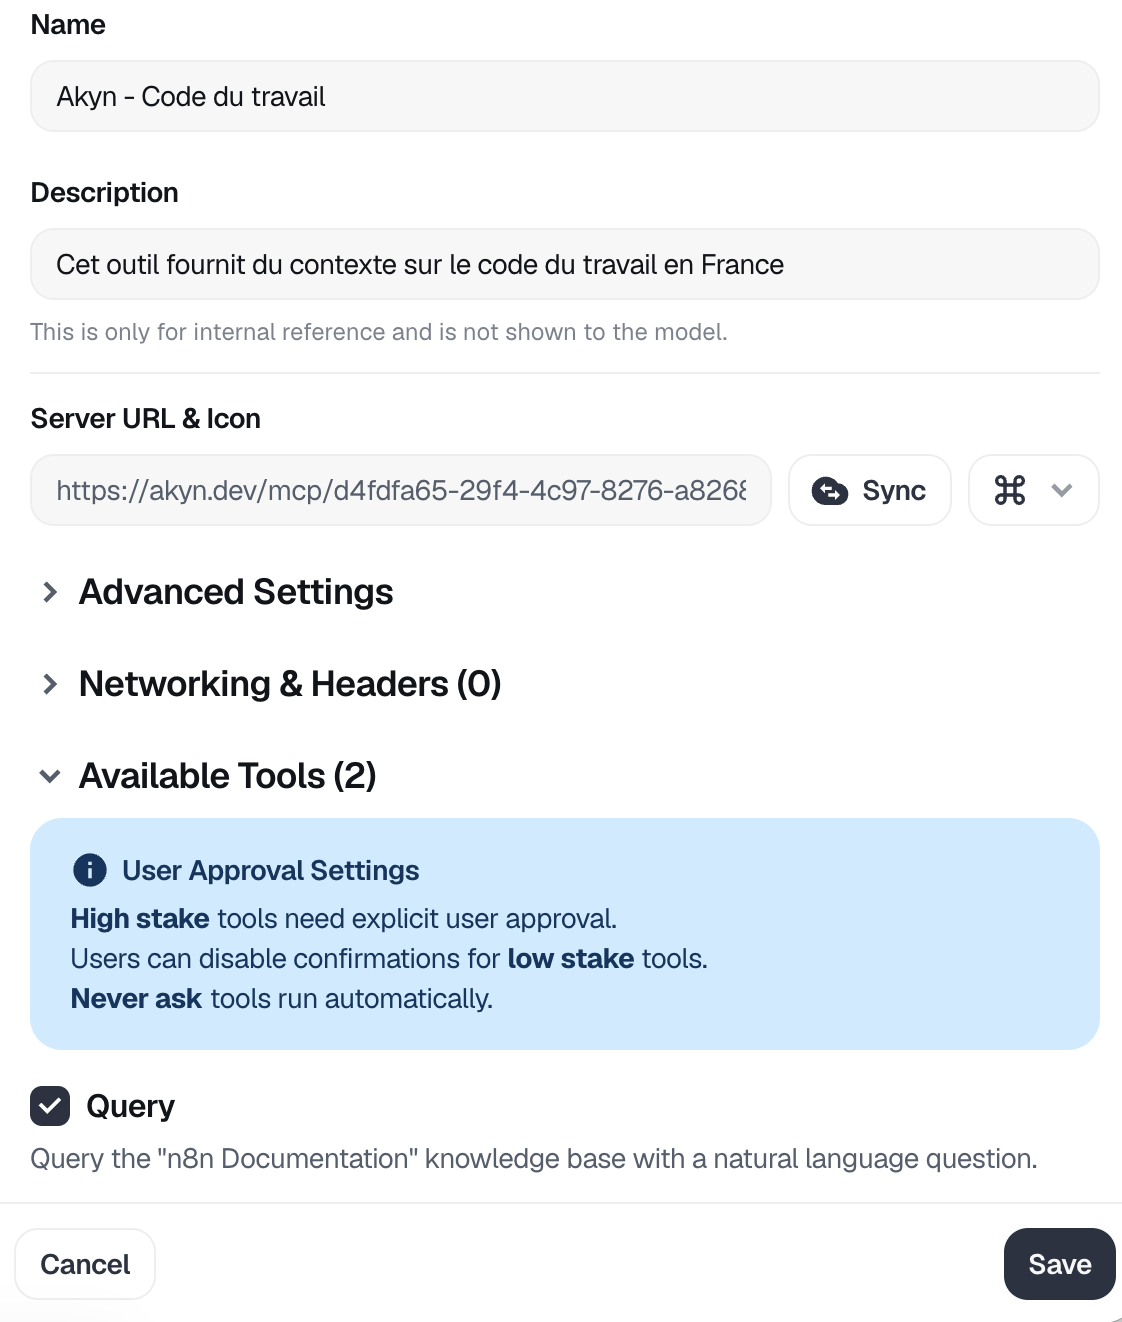
You should see query, list_sources, and optionally write_memory (if memory is enabled) in the Available Tools section.
Add the tool to your Dust agent
When creating or editing a Dust agent, go to the "Add tools" panel. You'll see your Akyn knowledge base listed as an available MCP tool. Select it to give your agent access to query your knowledge base.
💡 Tip: Multiple Knowledge Bases
You can add multiple Akyn MCP servers to Dust, each connected to a different knowledge base. Give each one a descriptive name so your agent knows which one to use for different queries.

Connect to LangChain
Use the MCP adapters to connect Akyn knowledge bases as tools in your LangChain agents.
Install packages:
pip install langchain-mcp-adapters langchain-openai langgraph
Connect to Akyn and create an agent:
from langchain_mcp_adapters.client import MultiServerMCPClient
from langgraph.prebuilt import create_react_agent
from langchain_openai import ChatOpenAI

client = MultiServerMCPClient({
    "akyn": {
        "url": "https://akyn.dev/mcp/[your-kb-id]",
        "transport": "streamable_http",
        "headers": {"Authorization": "Bearer [your-api-key]"}
    }
})

tools = await client.get_tools()
agent = create_react_agent(ChatOpenAI(model="gpt-4o"), tools)

response = await agent.ainvoke({
    "messages": [{"role": "user", "content": "What do you know about X?"}]
})
print(response["messages"][-1].content)
Available Tools
The MCP client exposes query (semantic search, with optional scope), list_sources, and write_memory when memory is enabled on the knowledge base.
Connect to Claude
Add Akyn knowledge bases as custom connectors in Claude to give it access to your custom context via MCP.
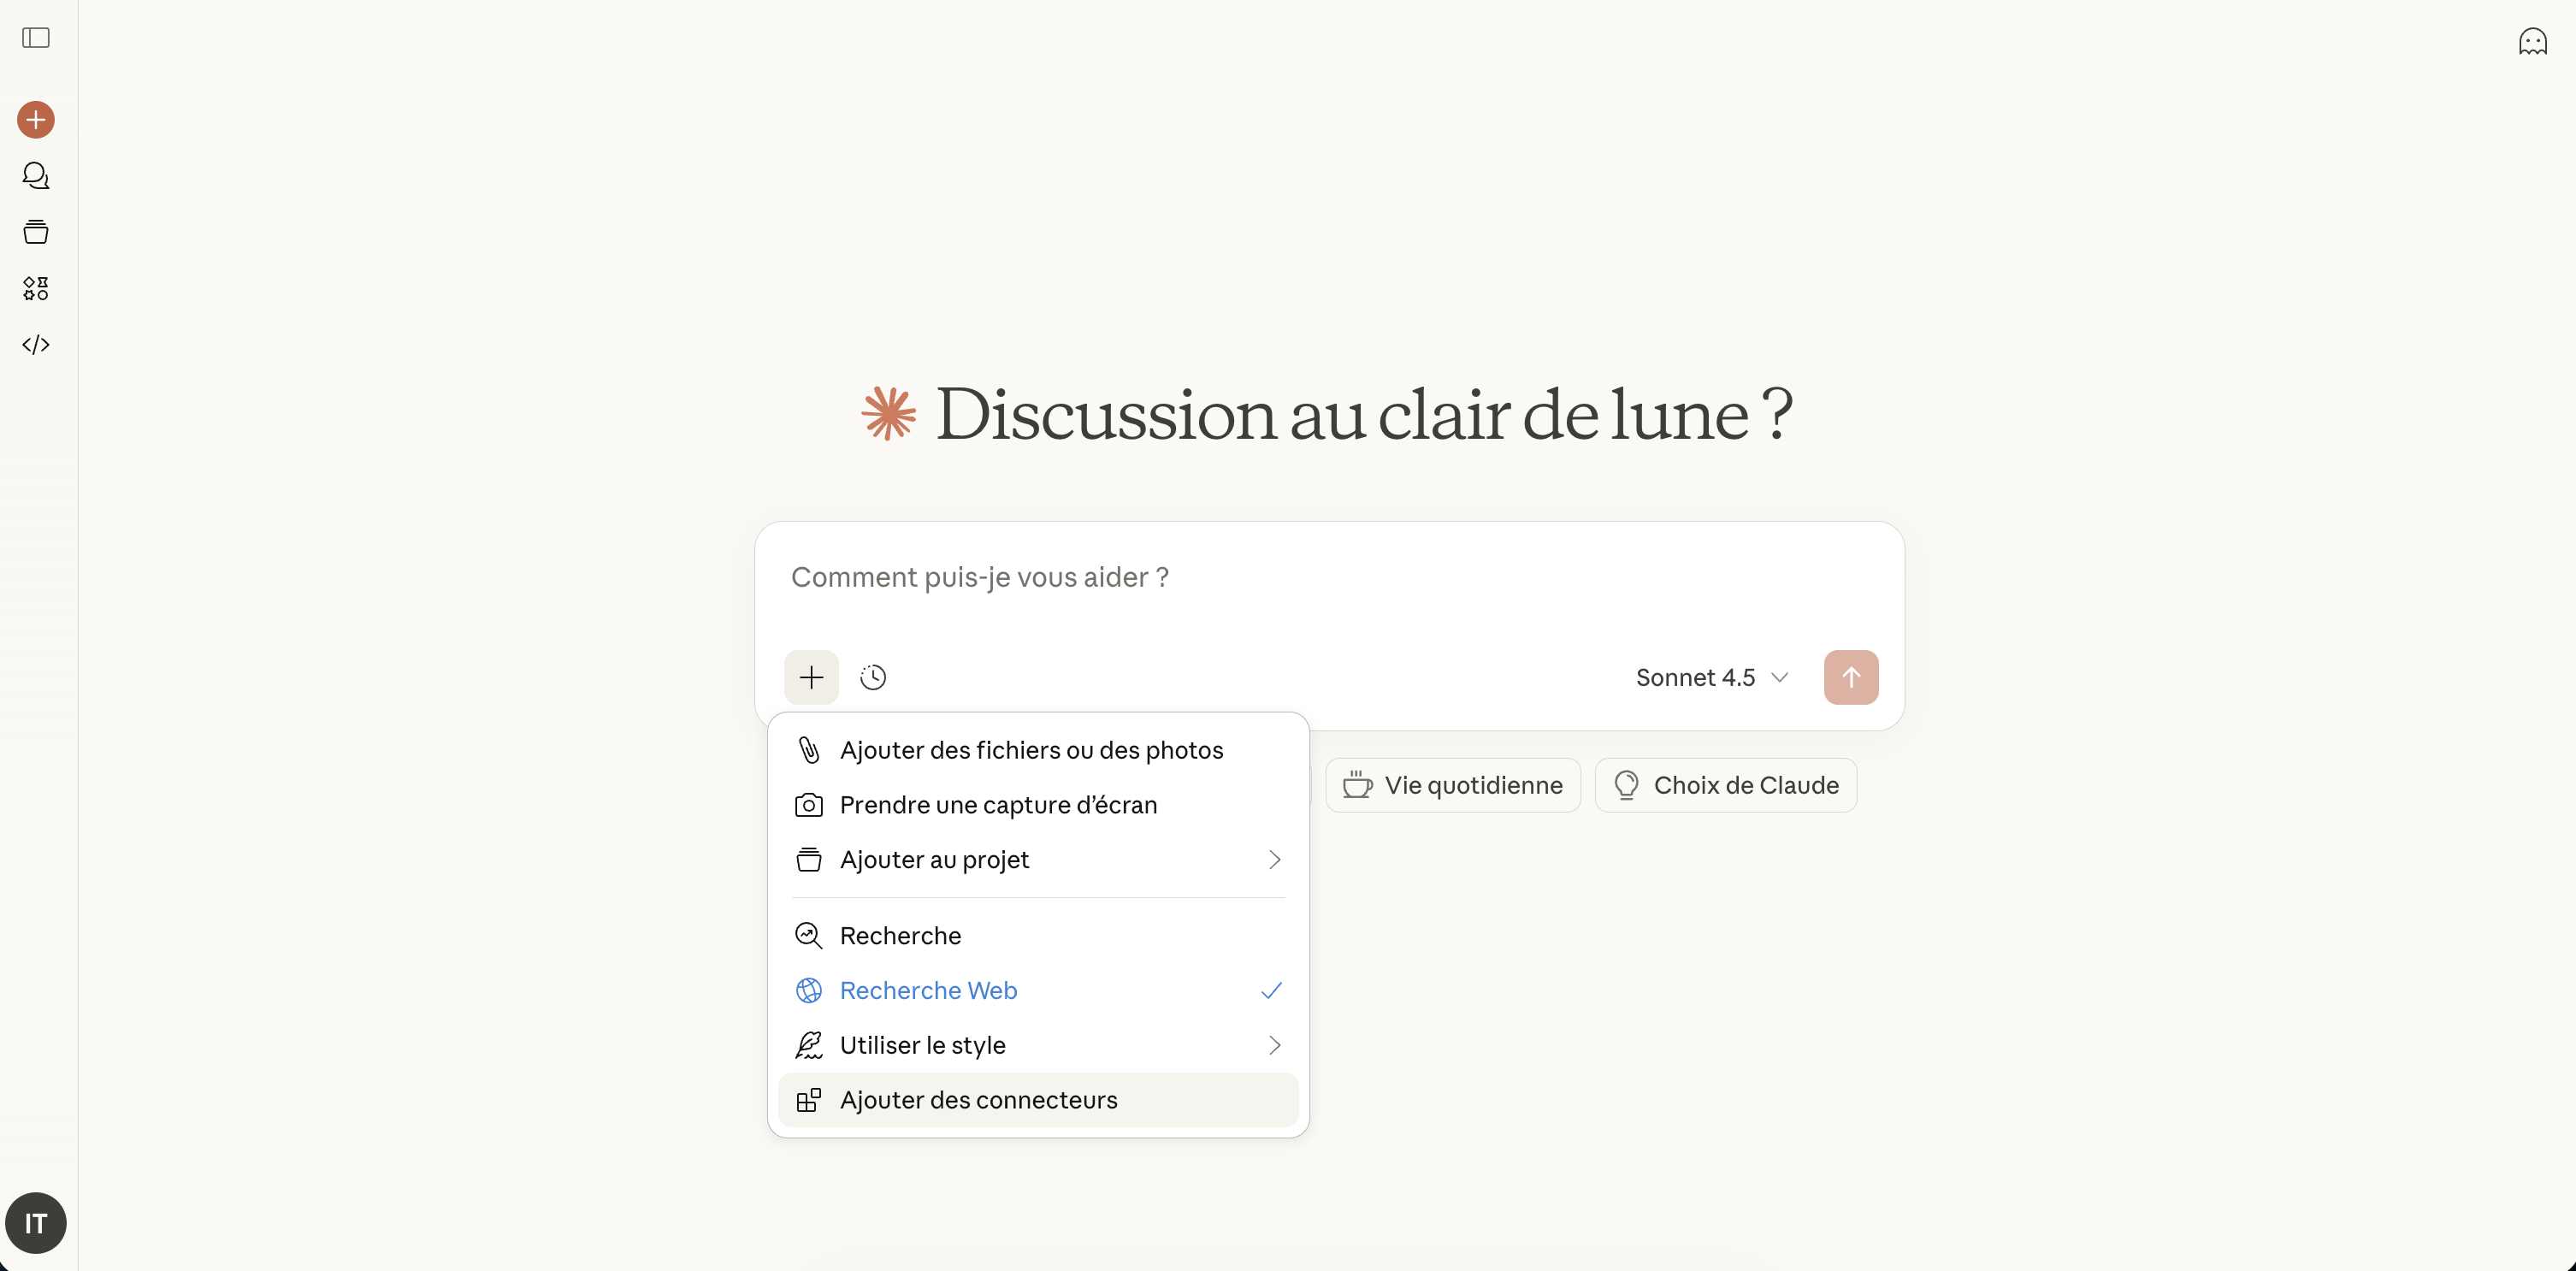
Open the connectors menu
On the Claude main screen, click the + button in the chat input, then select "Add connectors" from the menu.
Go to connector settings
In the connectors panel, click "Manage connectors" to access the connector settings.

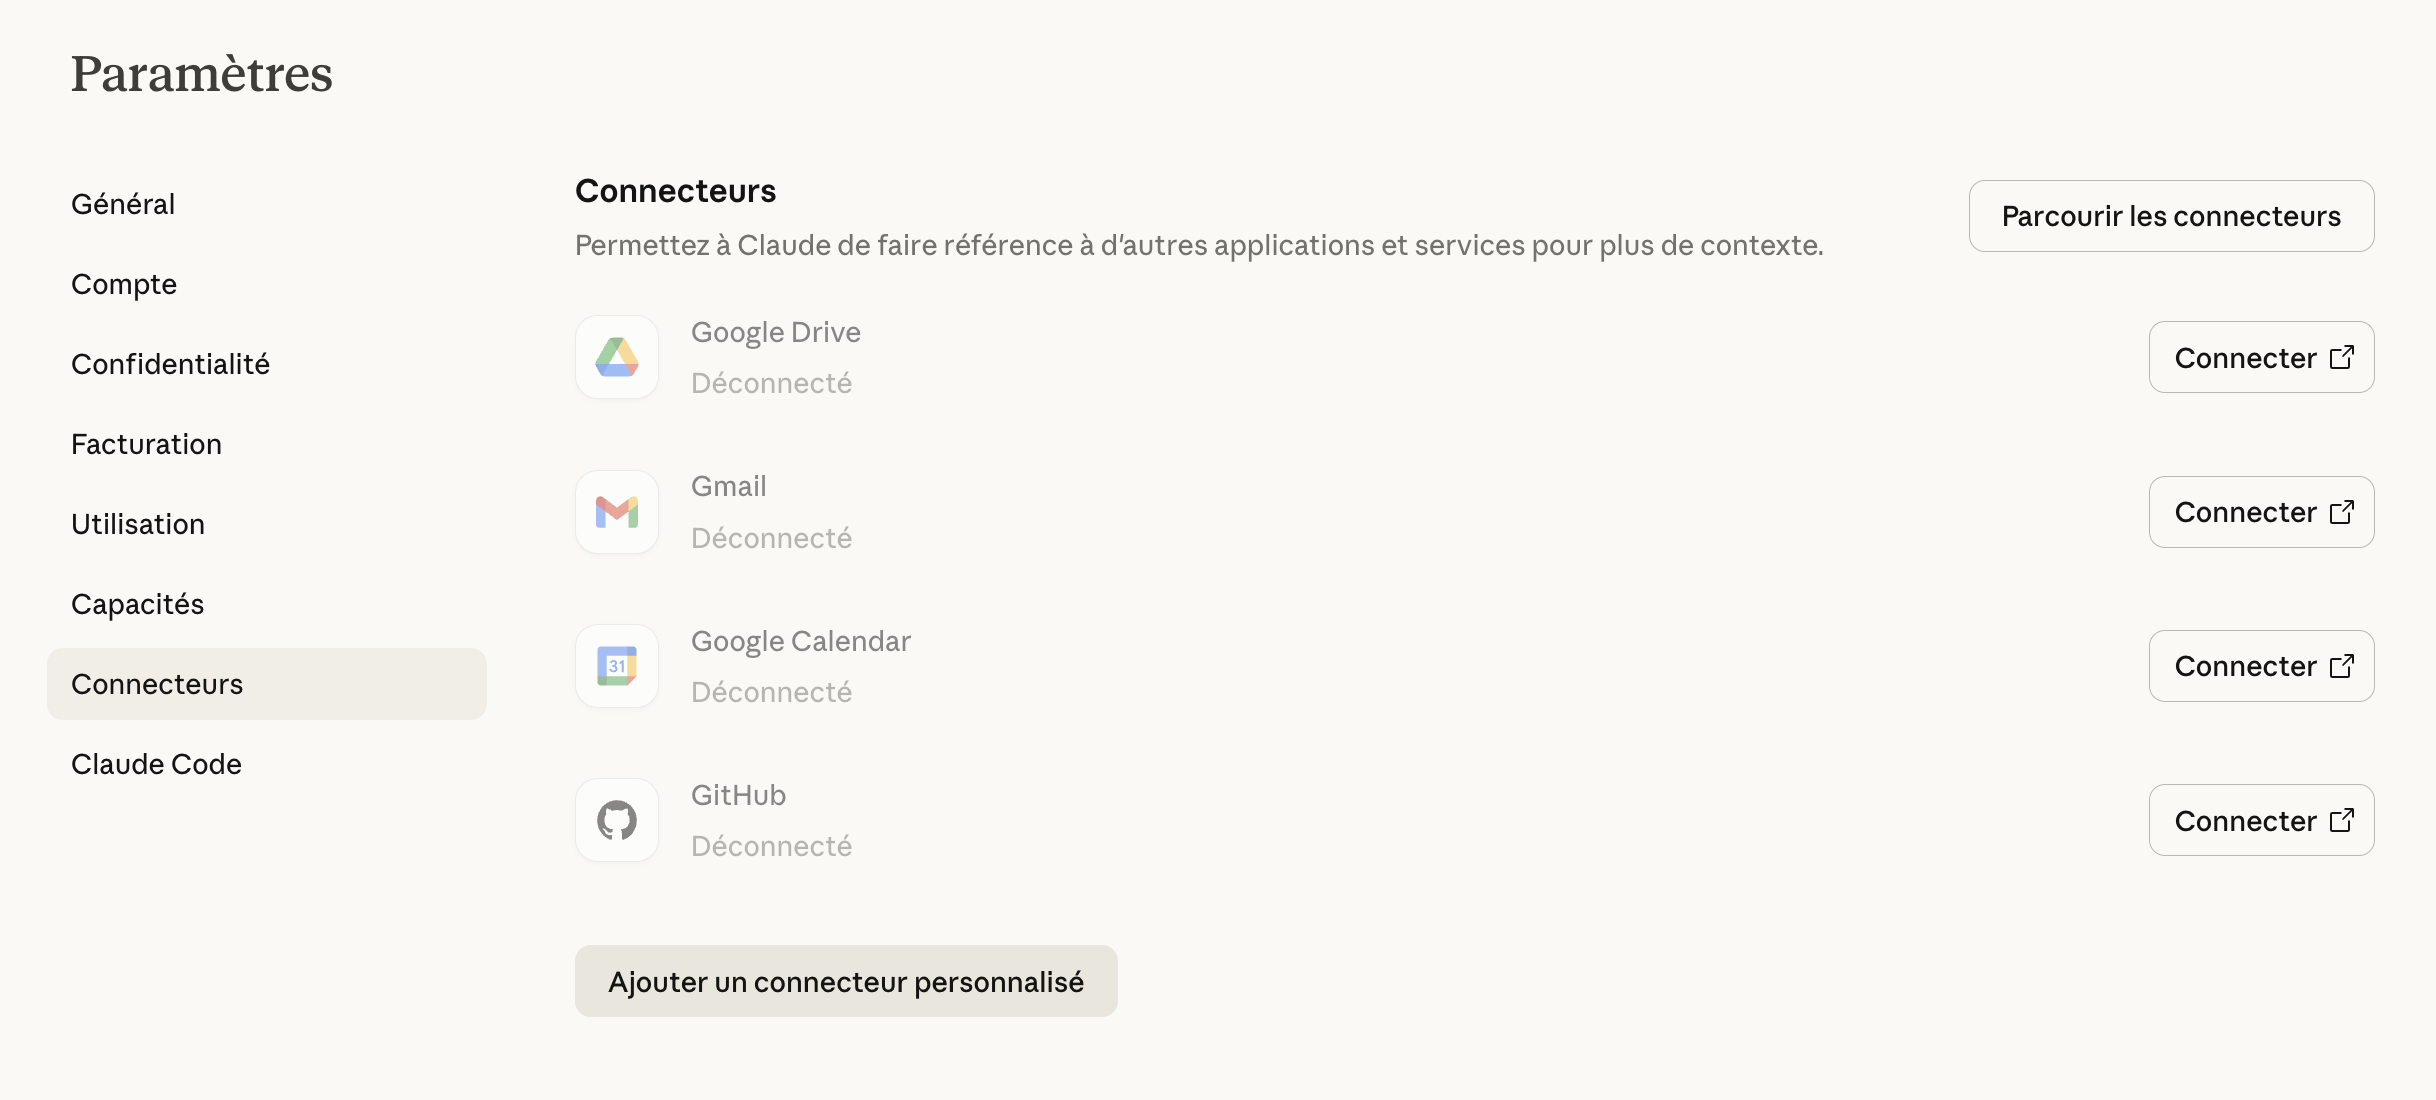
Add a custom connector
In the settings page, scroll down and click "Add a custom connector".
Enter your Akyn MCP URL
Give your connector a name and paste your Akyn knowledge base MCP URL:
- Name:A descriptive name for your knowledge base
- URL:
https://akyn.dev/mcp/[your-kb-id]
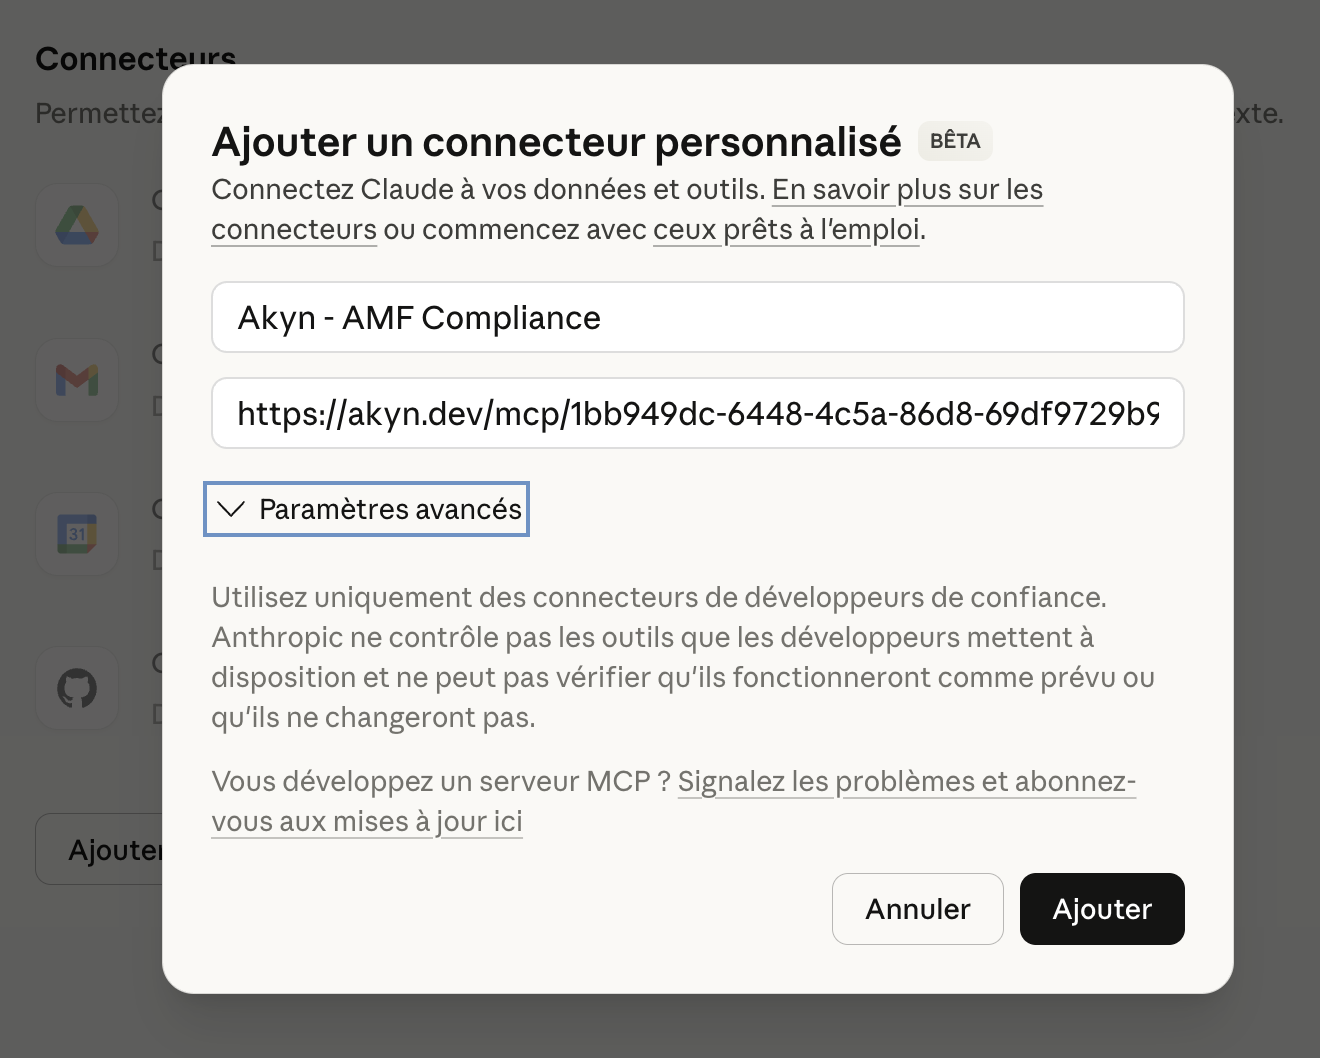
You can find your knowledge base MCP URL in your Akyn Dashboard.
Connect the connector
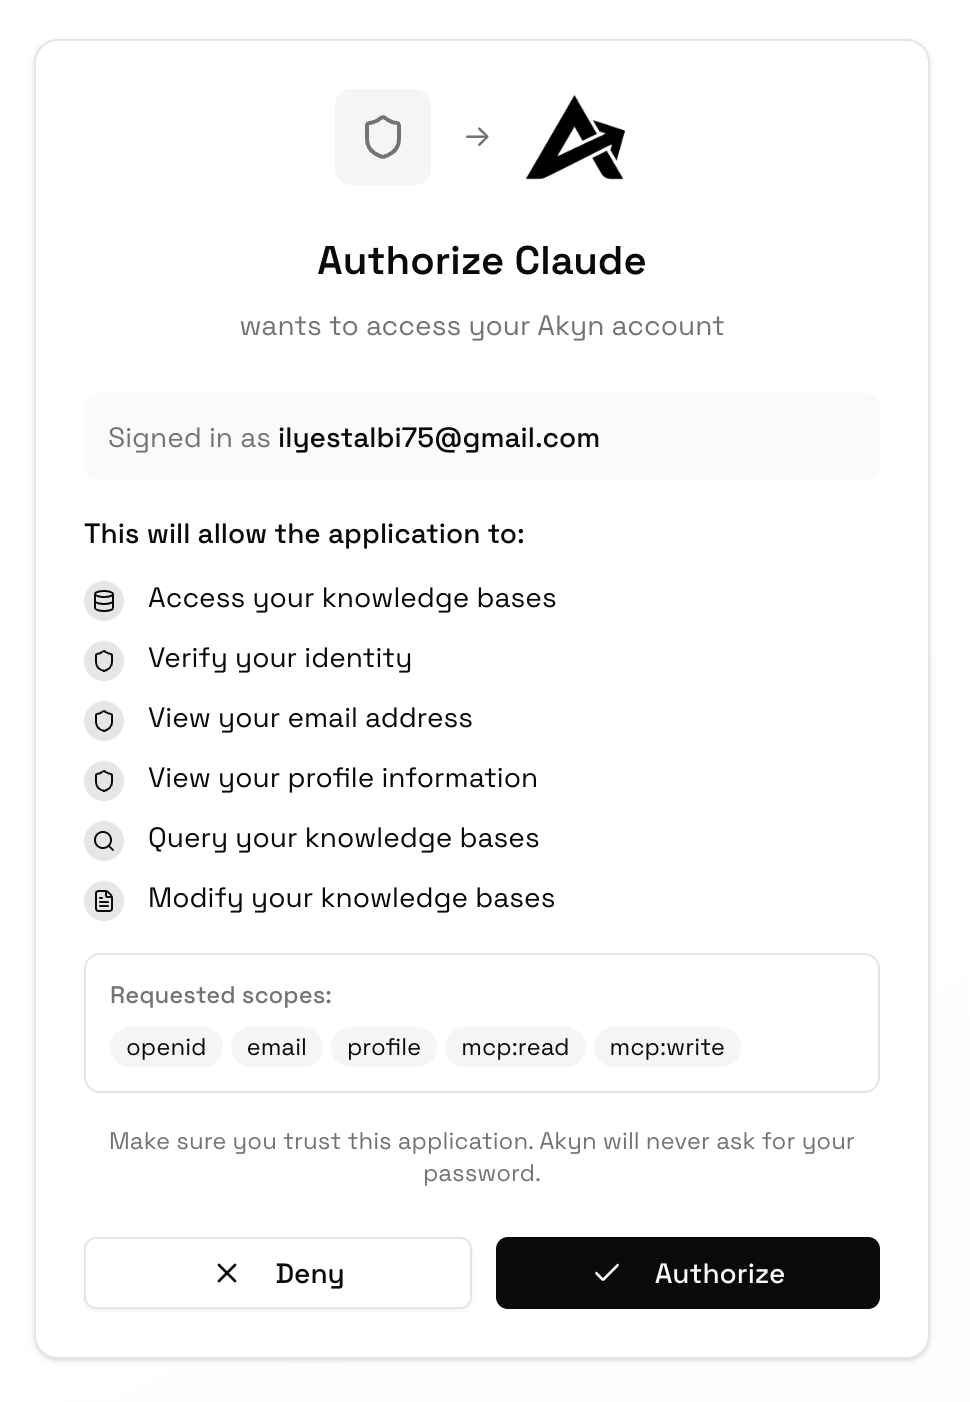
After adding the connector, click the "Connect" button to initiate the OAuth flow.

Authorize Claude to access Akyn
In the OAuth authorization panel, review the permissions and click "Authorize" to grant Claude access to your Akyn knowledge bases.
Configure tool permissions (optional)
After connecting, you can configure how Claude uses the tools. Choose whether tools are called automatically or require human approval for each call.
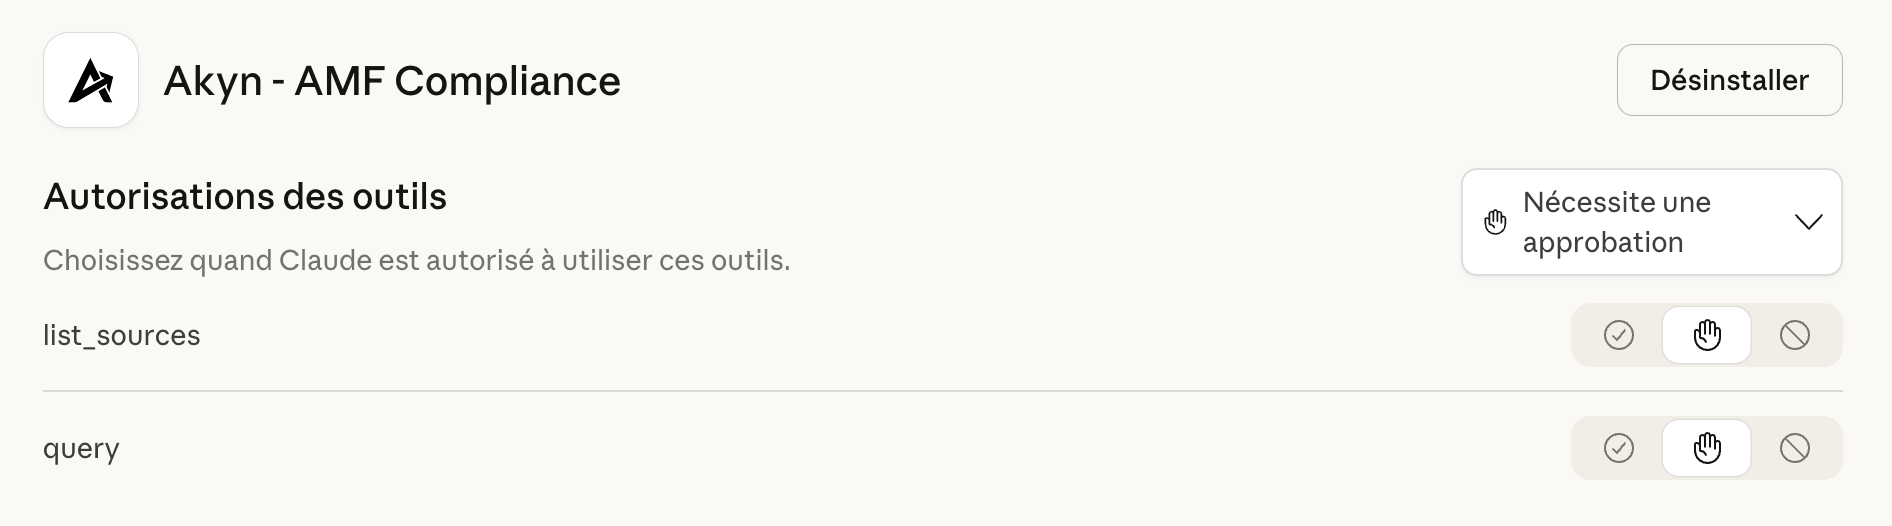
query searches with an optional scope; list_sources lists indexed documents; write_memory appears when memory is enabled on the base.
💡 Tip: Multiple Knowledge Bases
You can add multiple custom connectors, each connected to a different Akyn knowledge base. Give each one a descriptive name so Claude knows which one to use for different queries.

Connect to ChatGPT
Add Akyn knowledge bases as custom apps in ChatGPT to give it access to your custom context via MCP.
Go to Settings → Apps
In the ChatGPT web app, open the settings menu and navigate to the Apps section.
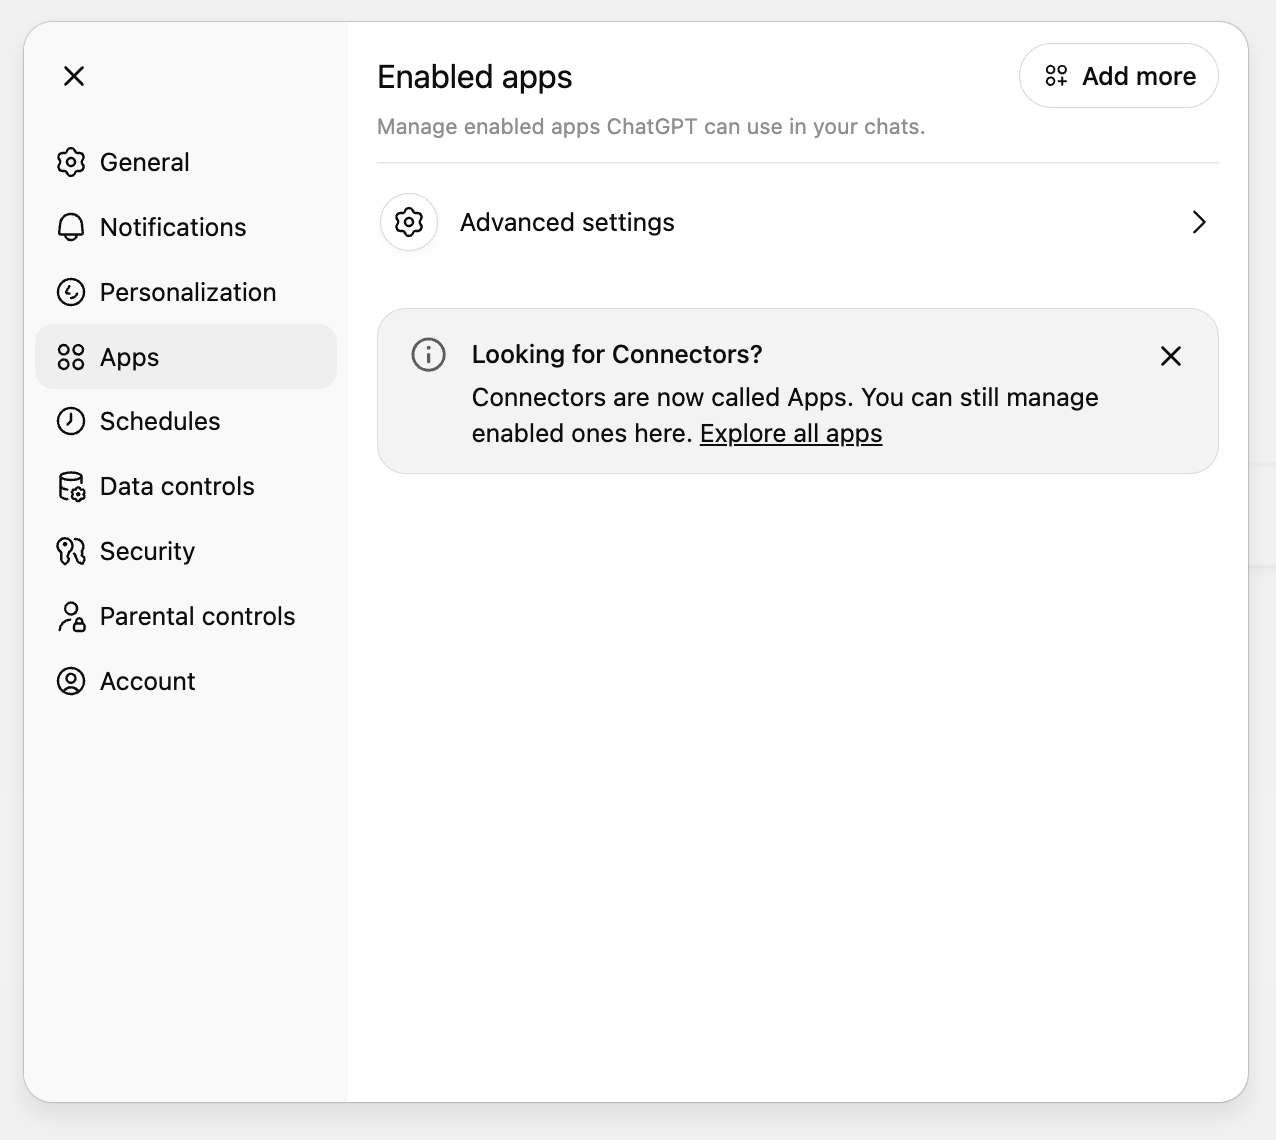
Enable Developer Mode
Click on Advanced settings and toggle on Developer mode. This allows you to add custom MCP servers as apps.
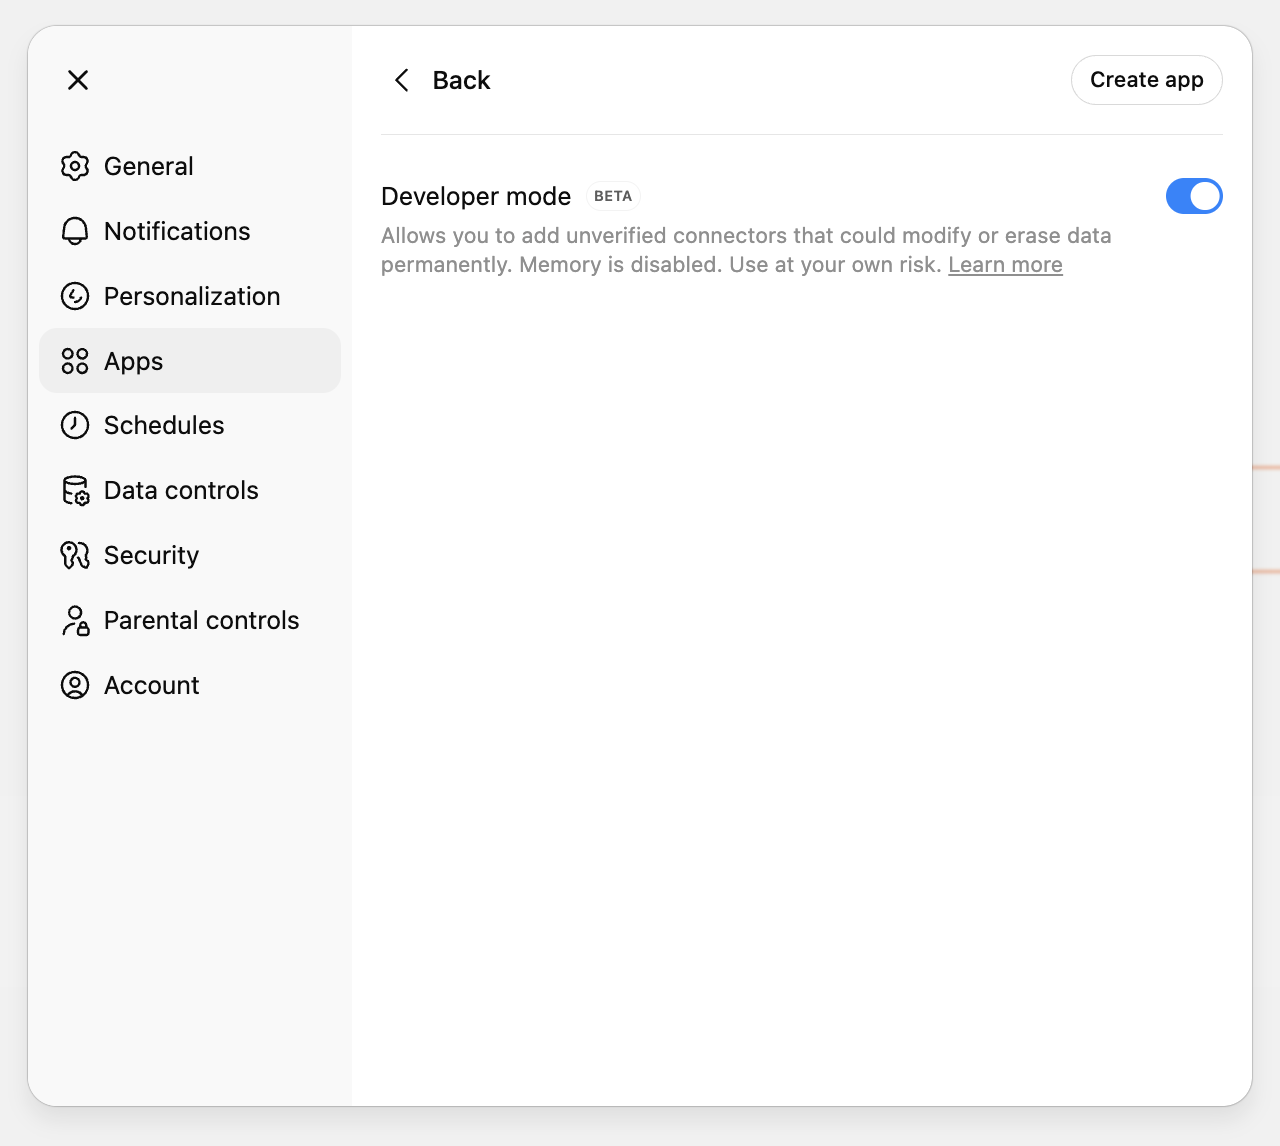
Note: Developer mode is in beta and allows adding unverified connectors.
Create a new App
Click "Create app" and fill in the following details:
- Name:A descriptive name for your knowledge base
- Description:(Optional) Helps the LLM understand when to use this KB
- MCP Server URL:
https://akyn.dev/mcp/[your-kb-id] - Authentication:OAuth
Check the box to accept the conditions, then click "Create".
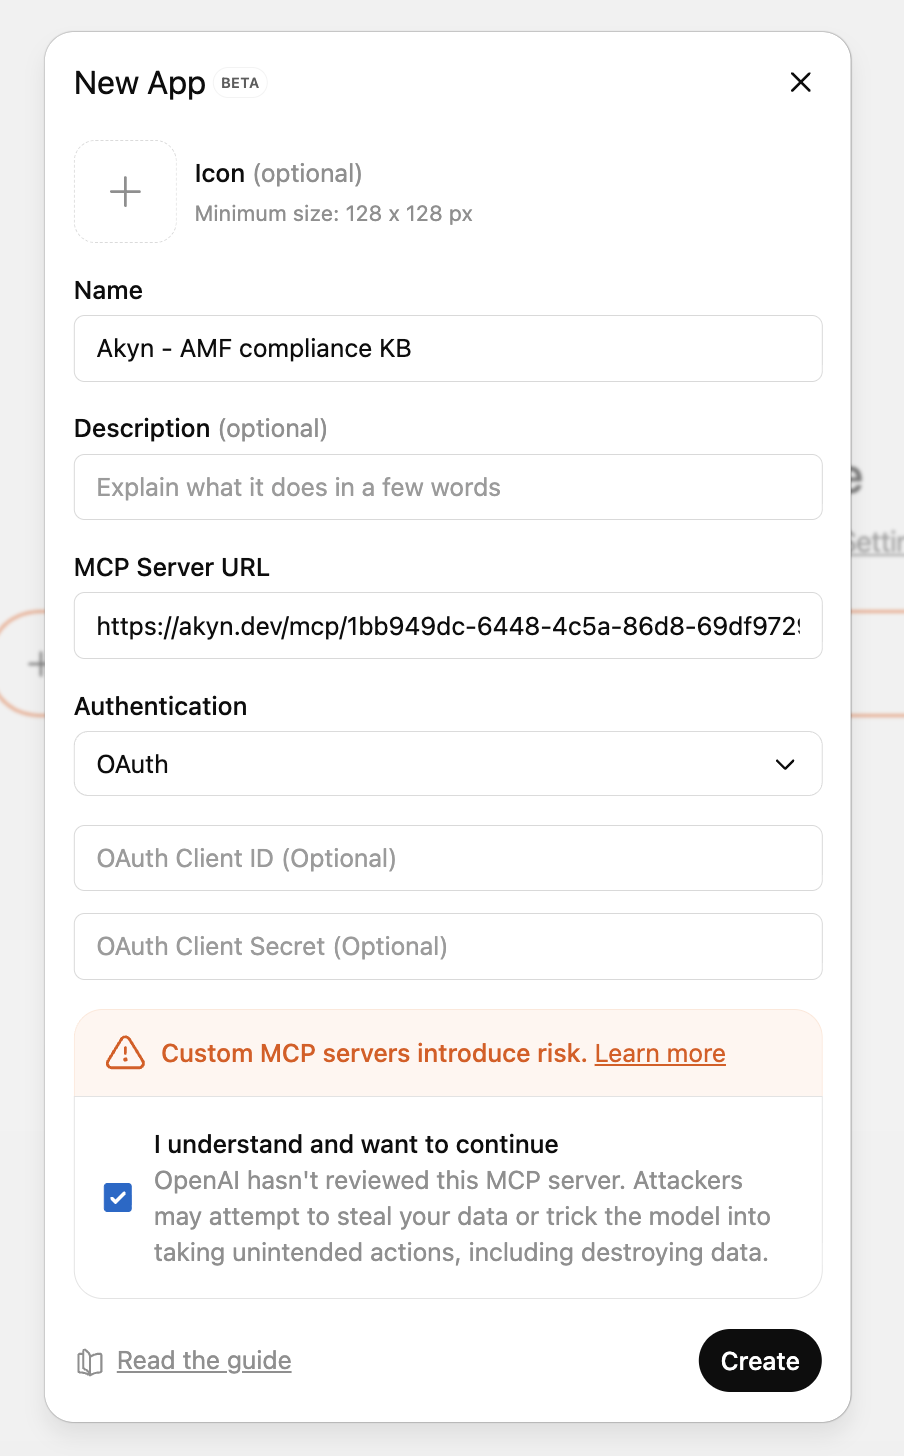
You can find your knowledge base MCP URL in your Akyn Dashboard.
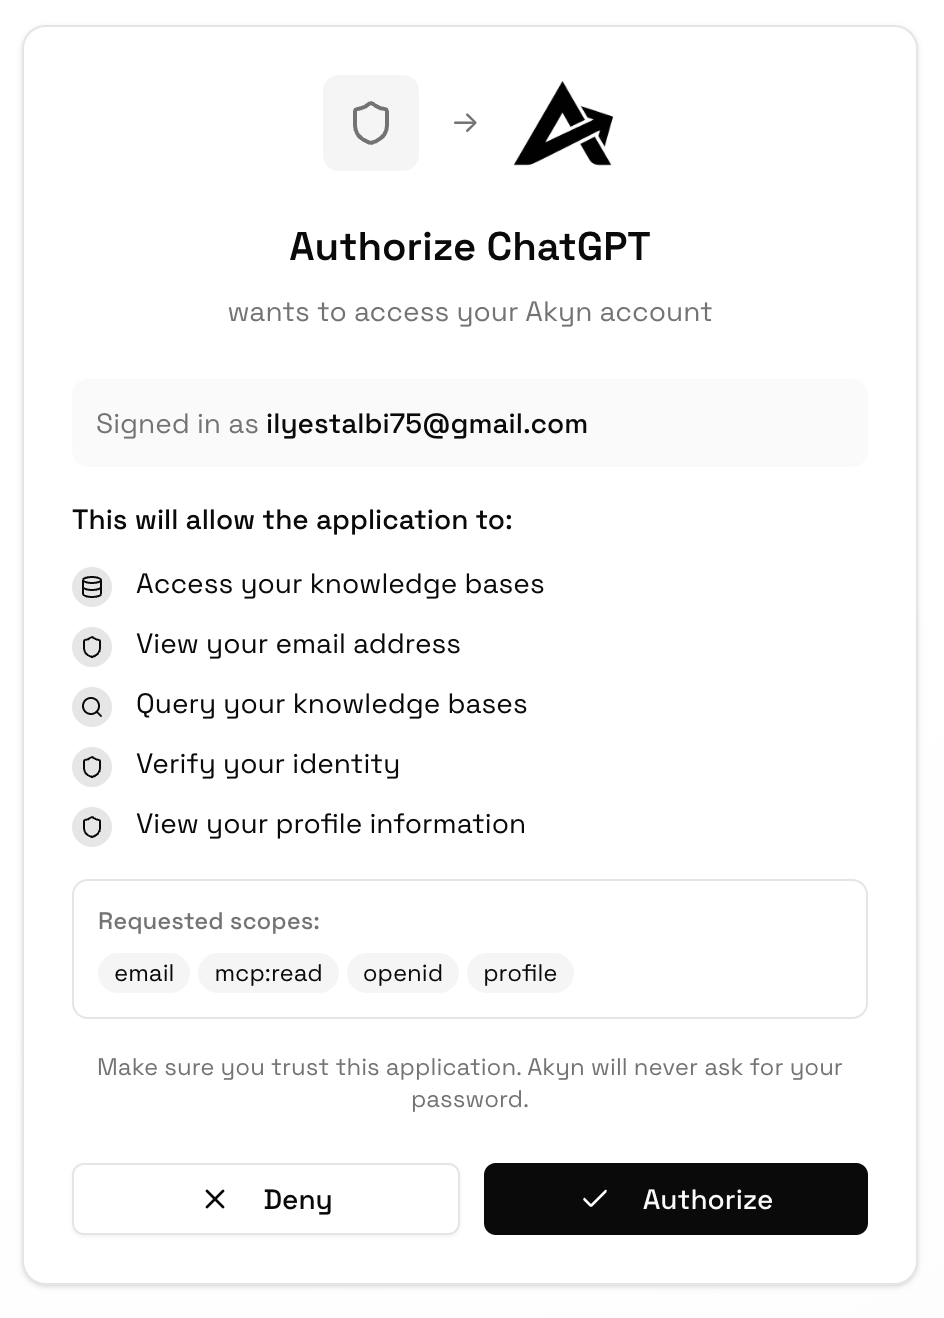
Authorize ChatGPT to access Akyn
After creating the app, you'll be redirected to the Akyn OAuth panel. Review the permissions and click "Authorize" to grant ChatGPT access to your knowledge bases.
Use the tool in your chats
Once connected, your Akyn knowledge base will appear in the tools menu. Click the + button in the chat input and select your knowledge base from "More" to enable it for the current conversation.
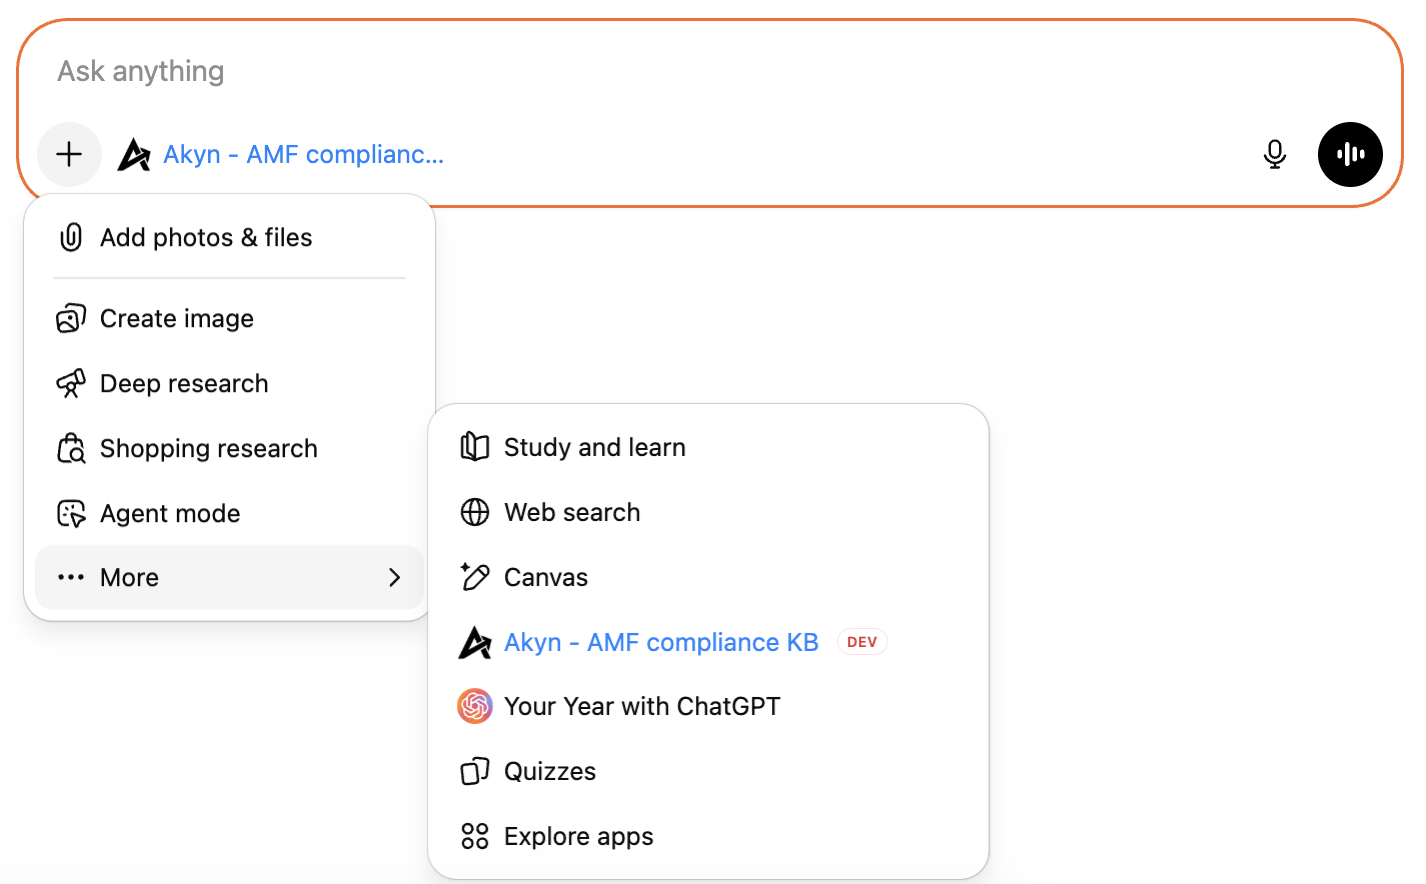
Apps marked with DEV are custom developer apps.
💡 Tip: Multiple Knowledge Bases
You can create multiple apps, each connected to a different Akyn knowledge base. Give each one a descriptive name and description so ChatGPT knows which one to use for different queries.

Connect to Cursor
Add Akyn knowledge bases as MCP servers in Cursor to give your AI assistant access to your custom context.
Go to Settings → Tools & MCP
Open Cursor settings and navigate to the Tools & MCP section in the sidebar.
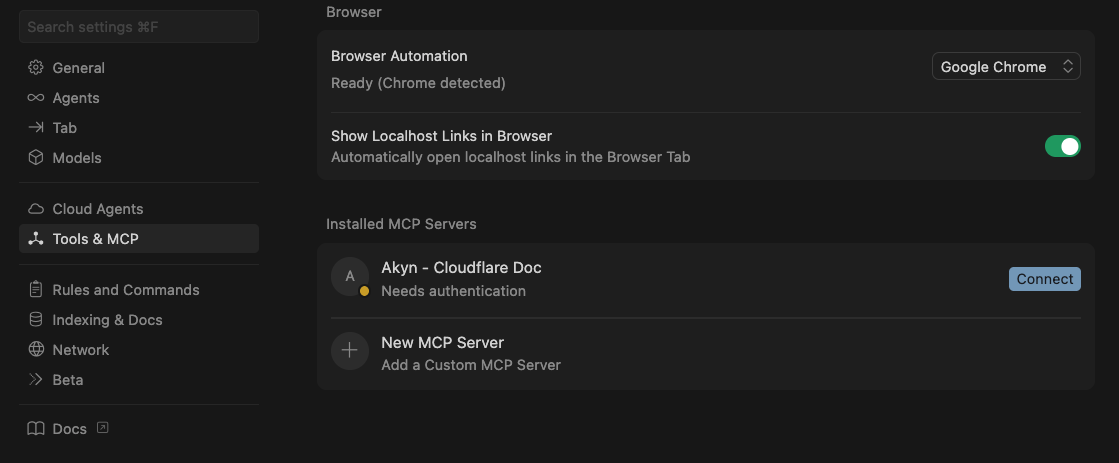
Click "New MCP Server"
In the Installed MCP Servers section, click on "New MCP Server" to add a custom MCP server.
Add the MCP configuration
Paste the following configuration, replacing the placeholders with your knowledge base ID and API key:
{
  "A name for your MCP": {
    "url": "https://akyn.dev/mcp/[kb-id]",
    "headers": {
      "Authorization": "Bearer YOUR_API_KEY"
    }
  }
}- Name:A descriptive name for your knowledge base
- [kb-id]:Your knowledge base ID from the Akyn dashboard
- YOUR_API_KEY:Your Akyn API key from Dashboard Settings
💡 Tip: Multiple Knowledge Bases
You can add multiple MCP servers to Cursor, each connected to a different Akyn knowledge base. Give each one a descriptive name so the AI assistant knows which one to use.
Notion Integration
Import pages directly from your Notion workspace into your Akyn knowledge bases. The content is automatically extracted, chunked, and embedded for semantic search.
Create a Notion integration
Go to notion.so/profile/integrations and click New integration.
Give it a name (e.g. "Akyn"), select the workspace you want to connect, and click Submit.
Under Capabilities, make sure Read content is checked. Then copy the Internal Integration Secret (it starts with ntn_).
Connect your token in Akyn
Go to Settings → Integrations in your Akyn dashboard. Paste your Integration Secret into the token field on the Notion card and confirm.
Akyn will verify the token with Notion and display your workspace name once connected.
Share pages with the integration in Notion
In Notion, open any page you want to import. Click the ••• menu in the top-right corner, then Connections → Connect to and select your integration.
You can share individual pages or entire parent pages — all child pages will be accessible too.
Important: The integration can only access pages you explicitly share with it. If a page doesn't appear when importing, check that it's connected to your integration in Notion.
Import pages into a knowledge base
Open a knowledge base in your dashboard and click Add Source. Select the Notion tab.
Browse or search your shared Notion pages, select the ones you want to import, and click Import. The pages will be fetched, converted to text, and processed in the background.
Troubleshooting
Pages not showing up?
Make sure the page is shared with your integration in Notion. Go to the page → ••• → Connections → add your integration.
Invalid token error?
Go to your Notion integrations page, open your integration, and copy a fresh token. Then disconnect and reconnect in Akyn settings.
Content seems incomplete?
Nested pages and databases are extracted up to 5 levels deep. Very deeply nested content may not be captured. Consider importing sub-pages separately.
Google Drive Integration
Import documents directly from your Google Drive into your Akyn knowledge bases. Supports PDFs, text files, Word documents, Google Docs, Sheets, and Slides.
Connect your Google account
Go to Settings → Integrations in your Akyn dashboard and click Connect with Google on the Google Drive card.
You'll be redirected to Google's authorization page. Sign in and grant read-only access to your Google Drive files.
Privacy: Akyn only requests read-only access and only downloads the specific files you choose to import. We never modify or delete files in your Drive.
Import files into a knowledge base
Open a knowledge base and click Add Source. Select the Drive tab.
Browse or search your files, select the ones you want to import, and click Import. Google Docs, Sheets, and Slides are automatically exported to text. PDFs and Word documents are parsed as usual.
Supported file types
Troubleshooting
Token expired?
Google tokens refresh automatically. If you see an expiration error, go to Settings → Integrations, disconnect Google Drive, and reconnect.
Files not showing up?
Only supported file types appear in the picker. Folders, images, videos, and other binary files are filtered out.